Tutorial. Part 3. Named child components
Source: https://github.com/enepomnyaschih/mt/tree/mt-2.3-3 (Git branch).
In this part we learn how to render child components that don't belong to lists. Examples of such components are the user profile panel and the tweet feed - they are child components of the application.
First, let's define ApplicationData class - new root model of the application.
src/model/ApplicationData.ts
import Tweet, {createTweetByJson} from "./Tweet";

export default class ApplicationData {

    constructor(readonly tweets: Tweet[] = []) {
    }

    static createByJson(json: any) {
        return new ApplicationData((<any[]>json || []).map(createTweetByJson));
    }
}
Now let's implement Application class - new root view of the application.
src/view/Application.jw.html
<div jwclass="mt-application">
    <div jwid="wrap">
        <div jwid="profile-box"></div>
        <div jwid="tweets"></div>
    </div>
</div>
src/view/Application.ts
import $ from "jquery";
import Component from "jwidget/Component";
import template from "jwidget/template";
import ApplicationData from "../model/ApplicationData";
import TweetFeed from "./TweetFeed";

@template(require("./Application.jw.html"))
export default class Application extends Component {

    constructor(private data: ApplicationData) {
        super();
    }

    protected renderTweets() {
        return this.own(new TweetFeed(this.data.tweets));
    }

    protected afterRender() {
        super.afterRender();
        $("html").addClass("mt-html");
        $("body").addClass("mt-body");
    }
}
Once again, we see method render<ChildId> (renderTweets), and once again it does something new. This time, it creates and returns an instance of TweetFeed class. It means that the instance of TweetFeed will be rendered at the place of element with jwid="tweets". This element will be completely replaced with the component, and all its CSS classes (here: "mt-application-tweets") will be copied into root element of the component.
Let's review some details of this feature.
First, it is important to understand that after instantiation of TweetFeed class object the component is not rendered yet. It means that it doesn't have HTML elements and capability to add child components. Component will be rendered automatically by jWidget, later. But if you really need to perform some additional actions with the rendered component (for example, add a CSS-class), you can render it explicitly using render method.
    protected renderTweets() {
        const view = this.own(new TweetFeed(this.data.tweets));
        view.render();
        view.el.addClass("my-extra-class");
        return view;
    }
Second, like in the previous parts, we should have a way to add a child component without render<ChildId> method definition. You can do it using children map.
    protected afterRender() {
        super.afterRender();
        this.children.put("tweets", this.own(new TweetFeed(this.data.tweets)));
    }
Select the way you like more, but, again, I will stick to render<ChildId> method.
Add styles.
src/view/Application.styl
.blocklink
    color inherit
    display block
    font inherit
    font-size 100%
    text-decoration inherit

.mt-html
.mt-body
    background #c0deed

.mt-application
    font-family Arial, sans-serif

    &-wrap
        background rgba(255,255,255,0.5)
        box-sizing border-box
        margin 0 auto
        overflow hidden
        padding 15px
        width 868px

    &-profile-box
        float left
        width 302px

    &-tweets
        float left
        margin-left 13px
Update index.styl and index.ts to apply the changes.
src/index.styl
// All Stylus files should be imported here in the preferred order

@import "view/Application"
@import "view/TweetFeed"
@import "view/TweetView"
src/index.ts
import "core-js/stable";
import "regenerator-runtime/runtime";
import "./index.styl";

import $ from "jquery";
import ApplicationData from "./model/ApplicationData";
import Application from "./view/Application";

$(function () {
    const data = ApplicationData.createByJson([
        {
            "fullName": "Road Runner",
            "shortName": "roadrunner",
            "avatarUrl48": "backend/avatar-48.png",
            "contentHtml": "jWidget documentation is here <a href=\"https://enepomnyaschih.github.com/jwidget\" target=\"_blank\">enepomnyaschih.github.com/jwidget</a>",
            "timeAgo": 215000,
            "like": false,
            "retweet": true
        },
        {
            "fullName": "Road Runner",
            "shortName": "roadrunner",
            "avatarUrl48": "backend/avatar-48.png",
            "contentHtml": "Tweet feed is growing",
            "timeAgo": 515000,
            "like": false,
            "retweet": false
        }
    ]);
    new Application(data).renderTo("body");
});
We'll see the next result.

Profile panel is remaining to implement.
Let's start with model once again. We need to collect data about current user profile. Let's create Profile model.
src/model/Profile.ts
export default interface Profile {

    readonly fullName: string;
    readonly shortName: string;
    readonly avatarUrl32: string;
    readonly avatarUrl48: string;
    readonly tweets: number;
    readonly following: number;
    readonly followers: number;
}
Now, let's add Profile to ApplicationData.
src/model/ApplicationData.ts
import Profile from "./Profile";
import Tweet, {createTweetByJson} from "./Tweet";

export default class ApplicationData {

    constructor(readonly profile: Profile, readonly tweets: Tweet[] = []) {
    }

    static createByJson(json: any) {
        return new ApplicationData(json.profile,
            (<any[]>json.tweets || []).map(createTweetByJson));
    }
}
Let's switch to view. Implement ProfileBox.
src/view/ProfileBox.jw.html
<div jwclass="mt-profile-box">
    <a jwid="top" class="blocklink" href="#">
        <div jwid="avatar"></div>
        <div jwid="full-name"></div>
        <div jwid="show-profile">Show my profile</div>
    </a>
    <div jwid="middle">
        <a jwid="count tweets" class="blocklink" href="#">
            <div jwid="count-value tweets-value"></div>
            <div jwid="count-label">TWEETS</div>
        </a>
        <a jwid="count count-border following" class="blocklink" href="#">
            <div jwid="count-value following-value"></div>
            <div jwid="count-label">FOLLOWING</div>
        </a>
        <a jwid="count count-border followers" class="blocklink" href="#">
            <div jwid="count-value followers-value"></div>
            <div jwid="count-label">FOLLOWERS</div>
        </a>
    </div>
    <div jwid="bottom">
        <form jwid="compose-form">
            <div jwid="compose-fields">
                <textarea jwid="compose-input" placeholder="Compose tweet..."></textarea>
            </div>
            <div jwid="compose-buttons">
                <input jwid="compose-submit" type="submit" value="Tweet">
            </div>
        </form>
    </div>
</div>
src/view/ProfileBox.ts
import Component from "jwidget/Component";
import template from "jwidget/template";
import Profile from "../model/Profile";

@template(require("./ProfileBox.jw.html"))
export default class ProfileBox extends Component {

    constructor(private profile: Profile) {
        super();
    }

    protected renderTop(el: JQuery) {
        el.attr("href", "https://twitter.com/" + this.profile.shortName);
    }

    protected renderAvatar(el: JQuery) {
        el.css("background-image", "url(" + this.profile.avatarUrl32 + ")");
    }

    protected renderFullName(el: JQuery) {
        el.text(this.profile.fullName);
    }

    protected renderTweets(el: JQuery) {
        el.attr("href", "https://twitter.com/" + this.profile.shortName);
    }

    protected renderTweetsValue(el: JQuery) {
        el.text(this.profile.tweets);
    }

    protected renderFollowingValue(el: JQuery) {
        el.text(this.profile.following);
    }

    protected renderFollowersValue(el: JQuery) {
        el.text(this.profile.followers);
    }
}
src/view/ProfileBox.styl
.mt-profile-box
    background #f9f9f9
    border 1px solid rgba(0,0,0,0.45)
    border-radius 6px
    box-sizing border-box

    &-full-name
    &-count-value
    &-compose-submit
        color #333
        font-family Arial, sans-serif
        font-size 14px
        font-weight bold
        text-shadow 0 1px 0 #fff

    &-show-profile,
    &-count-label
        color #999
        font-family Arial, sans-serif
        font-size 11px
        text-shadow 0 1px 0 #fff

    &-top
        border-bottom 1px solid #e8e8e8
        overflow hidden
        padding 12px
        padding-bottom 2px

    &-avatar
        background transparent none no-repeat 0 0
        border-radius 3px
        float left
        margin 0 10px 10px 0
        width 32px
        height 32px

    &-full-name
        padding-top 2px

    &-top:hover &-full-name
        color #0084b4
        text-decoration underline

    &-middle
        overflow hidden

    &-count
        float left
        padding 7px 12px

        &:hover &-value
            color #0084b4

        &:hover &-label
            color #0084b4

        &-border
            border-left 1px solid #e8e8e8

    &-bottom
        background #f5f5f5
        border-radius 0 0 6px 6px
        border-top 1px solid #e8e8e8
        padding 10px 12px

    &-compose
        &-input
            border 1px solid #ccc
            border-radius 3px
            box-sizing border-box
            padding 8px
            width 274px

        &-buttons
            text-align right

        &-submit
            background #19aadf
            border 1px solid #057ed0
            border-radius 4px
            color #fff
            cursor pointer
            padding 6px 10px
            text-shadow 0 -1px 0 rgba(0,0,0,0.45)

            &:hover
                background #09a0d7
Add profile box rendering method to Application.
    protected renderProfileBox() {
        return this.own(new ProfileBox(this.data.profile));
    }
Register ProfileBox styles.
src/index.styl
// All Stylus files should be imported here in the preferred order

@import "view/Application"
@import "view/ProfileBox"
@import "view/TweetFeed"
@import "view/TweetView"
And enhance the data JSON with profile data.
src/index.ts
import "core-js/stable";
import "regenerator-runtime/runtime";
import "./index.styl";

import $ from "jquery";
import ApplicationData from "./model/ApplicationData";
import Application from "./view/Application";

$(function () {
    const data = ApplicationData.createByJson({
        "profile": {
            "fullName": "Road Runner",
            "shortName": "roadrunner",
            "avatarUrl32": "backend/avatar-32.png",
            "avatarUrl48": "backend/avatar-48.png",
            "tweets": 380,
            "following": 21,
            "followers": 27
        },
        "tweets": [
            {
                "fullName": "Road Runner",
                "shortName": "roadrunner",
                "avatarUrl48": "backend/avatar-48.png",
                "contentHtml": "jWidget documentation is here <a href=\"https://enepomnyaschih.github.com/jwidget\" target=\"_blank\">enepomnyaschih.github.com/jwidget</a>",
                "timeAgo": 215000,
                "like": false,
                "retweet": true
            }, {
                "fullName": "Road Runner",
                "shortName": "roadrunner",
                "avatarUrl48": "backend/avatar-48.png",
                "contentHtml": "Tweet feed is growing",
                "timeAgo": 515000,
                "like": false,
                "retweet": false
            }
        ]
    });
    new Application(data).renderTo("body");
});
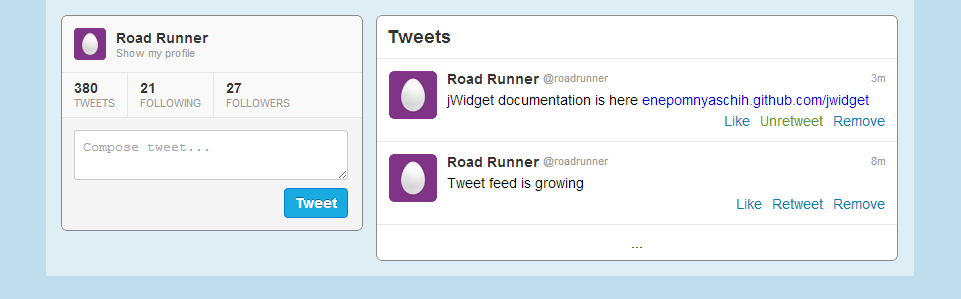
Here is the result, which represents original requirements.
We've learned how to render components and add them into each other. Now it's the time to add a bit of dynamics into our application. We'll describe this in the next part.
Tutorial. Part 4. Messages