Tutorial. Part 1. Model and view
Source: https://github.com/enepomnyaschih/mt/tree/mt-2.1-1 (Git branch).
This tutorial shows you a way to develop your own Twitter in several steps using jWidget 2 and TypeScript.
If you want to learn how to develop powerful Model-View-applications with jWidget 2, please follow these steps accurately in the same order. If motivation of some action is unclear for you, then probably we'll explain it at the next steps. Please don't deviate from this strategy yet.
In the first sample we take a look at model and view. We will develop a simple UI component which takes data from a model to render itself.
First, download jWidget 2 project template. The template gives you a good starting point. Now you don't need to bother about the environment configuration process. Just extract the template to some folder at your disk and run:
npm install
npm start
These commands install the dependencies, create "public" folder with the compiled application files and start watching the source files for any modifications. You need to serve "public" folder via some Web server, for example (run in a separate terminal):
npm install -g serve
serve public
This command will display the URL of the served files. Open it in your browser. It should display "Hello, World!" message.
Now we are ready to depelop the application. Download profile avatar files avatar-32.png and avatar-48.png to "static/backend" folder.
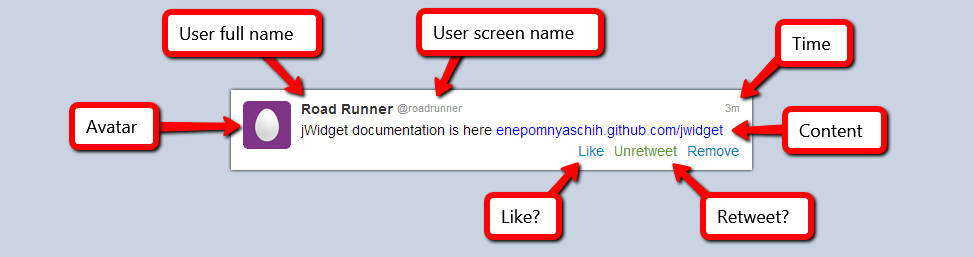
Our goal is to implement a component for tweet representation:

Let's find out, what data we have here, i.e. what can be different for a couple of different tweets:
Let's define an interface storing this data, i.e. tweet model:
src/model/Tweet.ts
export default interface Tweet {

    readonly fullName: string;
    readonly shortName: string;
    readonly avatarUrl48: string;
    readonly contentHtml: string;
    readonly time: number;
    readonly like: boolean;
    readonly retweet: boolean;
}

export function createTweetByJson(json: any): Tweet {
    return {
        ...json,
        time: new Date().getTime() - json["timeAgo"]
    };
}
Model development is finished, so let's implement a view. Define TweetView component as follows:
src/view/TweetView.ts
import Component from "jwidget/Component";
import template from "jwidget/template";
import Tweet from "../model/Tweet";

@template(require<string>("./TweetView.jw.html"))
export default class TweetView extends Component {

    constructor(_tweet: Tweet) {
        super();
    }
}
Next, we need to bind an HTML template to this component. It should be defined in a separate file:
src/view/TweetView.jw.html
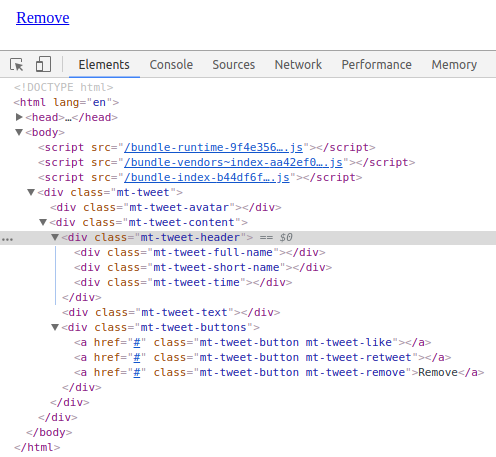
<div jwclass="mt-tweet">
    <div jwid="avatar"></div>
    <div jwid="content">
        <div jwid="header">
            <div jwid="full-name"></div>
            <div jwid="short-name"></div>
            <div jwid="time"></div>
        </div>
        <div jwid="text"></div>
        <div jwid="buttons">
            <a jwid="button like" href="#"></a>
            <a jwid="button retweet" href="#"></a>
            <a jwid="button remove" href="#">Remove</a>
        </div>
    </div>
</div>
This is usual HTML except one thing: special attributes "jwclass" and "jwid". "jwclass" is a root CSS-class of the component, and the prefix for all elements which have "jwid" defined. CSS-class of each element with "jwid" will be <jwclass>-<jwid>. So, the template above will expand to the next HTML:
<div class="mt-tweet">
    <div class="mt-tweet-avatar"></div>
    <div class="mt-tweet-content">
        <div class="mt-tweet-header">
            <div class="mt-tweet-full-name"></div>
            <div class="mt-tweet-short-name"></div>
            <div class="mt-tweet-time"></div>
        </div>
        <div class="mt-tweet-text"></div>
        <div class="mt-tweet-buttons">
            <a class="mt-tweet-button mt-tweet-like" href="#"></a>
            <a class="mt-tweet-button mt-tweet-retweet" href="#"></a>
            <a class="mt-tweet-button mt-tweet-remove" href="#">Remove</a>
        </div>
    </div>
</div>
Presence of a common prefix mt-tweet- in all elements simplifies component slicing via various CSS-preprocessors like Sass, LESS and Stylus.
It is time to run our application. To do it, we need testing data and a main entry point. Let's define them in index.ts file.
src/index.ts
import "es6-promise/auto";
import "script-loader!jquery";
import "./index.styl";

import {createTweetByJson} from "./model/Tweet";
import TweetView from "./view/TweetView";

$(function () {
    const tweet = createTweetByJson({
        "fullName": "Road Runner",
        "shortName": "roadrunner",
        "avatarUrl48": "backend/avatar-48.png",
        "contentHtml": "jWidget documentation is here <a href=\"https://enepomnyaschih.github.com/jwidget\" target=\"_blank\">enepomnyaschih.github.com/jwidget</a>",
        "timeAgo": 215000,
        "like": false,
        "retweet": true
    });
    new TweetView(tweet).renderTo("body");
});
The first two imports are mandatory for jWidget, because the framework depends on native ES6 promises and jQuery. Native ES6 promises are not yet supported by all browsers, so we need to register a polyfill for it.
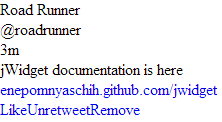
Make sure that WebPack (running under "npm start") doesn't display any errors and refresh the browser page. You'll see something like this:
As you can see, our component has a structure but doesn't have any data. Let's bind the component elements to the data. jWidget framework doesn't provide any magic HTML syntax for this. So, we won't change the template, but we'll add some TypeScript code. The real tool that jWidget provides for us is direct and fast access to jQuery-wrappers over all HTML elements having "jwid" attribute defined. You can access these elements inside method afterRender via method getElement:
src/view/TweetView.ts
import Component from "jwidget/Component";
import template from "jwidget/template";
import Tweet from "../model/Tweet";

@template(require<string>("./TweetView.jw.html"))
export default class TweetView extends Component {

    constructor(private tweet: Tweet) {
        super();
    }

    protected afterRender() {
        super.afterRender();
        this.getElement("avatar").css("background-image", `url(${this.tweet.avatarUrl48})`);

        const timeAgo = new Date().getTime() - this.tweet.time;
        const text = this._getTimeString(timeAgo);
        this.getElement("time").text(text);

        this.getElement("full-name").text(this.tweet.fullName);
        this.getElement("short-name").text("@" + this.tweet.shortName);
        this.getElement("text").html(this.tweet.contentHtml);
        this.getElement("like").toggleClass("active", this.tweet.like).text(this.tweet.like ? "Unlike" : "Like");
        this.getElement("retweet").toggleClass("active", this.tweet.retweet).text(this.tweet.retweet ? "Unretweet" : "Retweet");
    }

    private _getTimeString(timeAgo: number) {
        const minutes = timeAgo / 60000;
        if (minutes < 1) {
            return "Just now";
        }
        if (minutes < 60) {
            return Math.floor(minutes) + "m";
        }
        const hours = minutes / 60;
        if (hours < 24) {
            return Math.round(hours) + "h";
        }

        function pad(value: number): string {
            return (value < 10) ? ("0" + value) : String(value);
        }

        const date = new Date(new Date().getTime() - timeAgo);
        return date.getDate() + "." + pad(date.getMonth());
    }
}
Result:
Works well, but looks poorly. Let's demonstrate the magic of slicing. I prefer Stylus for this purpose, and its interpreter is already configured in jWidget project template.
src/view/TweetView.styl
.mt-tweet
    background #fff
    border-top 1px solid #e8e8e8
    box-sizing border-box
    font-family Arial,sans-serif
    font-size 14px
    overflow hidden
    padding 12px
    width 520px

    &:hover
        background #f5f5f5

    &-full-name
        color #333
        font-family Arial, sans-serif
        font-size 14px
        font-weight bold
        text-shadow 0 1px 0 #fff

    &-short-name
    &-time
        color #999
        font-family Arial, sans-serif
        font-size 11px
        text-shadow 0 1px 0 #fff

    &-avatar
        background transparent none no-repeat 0 0
        border-radius 5px
        float left
        margin-right 10px
        width 48px
        height 48px

    &-content
        float left
        width 438px

    &-header
        overflow hidden

    &-full-name
        float left
        margin-right 4px

    &-short-name
        float left

    &-time
        float right

    &-text
        padding 5px 0

    &-buttons
        text-align right

    &-button
        color #0084b4
        cursor pointer
        display inline-block

    &-like
    &-retweet
        margin-right 10px

    &-like.active
        color #ff9b00

    &-retweet.active
        color #609928
Add this Stylus file into index.styl:
src/index.styl
// All Stylus files should be imported here in the preferred order

@import "view/TweetView"
As result, we'll see what we wanted to:
Let's review one more thing. We can write JS code of the component in a different way. Instead of accessing the elements via getElement method, let's just define methods render<ChildId>, where <ChildId> is "jwid" of an element written in CapitalizedCamelCase:
src/view/TweetView.ts
import Component from "jwidget/Component";
import template from "jwidget/template";
import Tweet from "../model/Tweet";

@template(require<string>("./TweetView.jw.html"))
export default class TweetView extends Component {

    constructor(private tweet: Tweet) {
        super();
    }

    protected renderAvatar(el: JQuery) {
        el.css("background-image", `url(${this.tweet.avatarUrl48})`);
    }

    protected renderTime(el: JQuery) {
        const timeAgo = new Date().getTime() - this.tweet.time;
        const text = this._getTimeString(timeAgo);
        el.text(text);
    }

    protected renderFullName(el: JQuery) {
        el.text(this.tweet.fullName);
    }

    protected renderShortName(el: JQuery) {
        el.text("@" + this.tweet.shortName);
    }

    protected renderText(el: JQuery) {
        el.html(this.tweet.contentHtml);
    }

    protected renderLike(el: JQuery) {
        el.toggleClass("active", this.tweet.like).text(this.tweet.like ? "Unlike" : "Like");
    }

    protected renderRetweet(el: JQuery) {
        el.toggleClass("active", this.tweet.retweet).text(this.tweet.retweet ? "Unretweet" : "Retweet");
    }

    private _getTimeString(timeAgo: number) {
        const minutes = timeAgo / 60000;
        if (minutes < 1) {
            return "Just now";
        }
        if (minutes < 60) {
            return Math.floor(minutes) + "m";
        }
        const hours = minutes / 60;
        if (hours < 24) {
            return Math.round(hours) + "h";
        }

        function pad(value: number): string {
            return (value < 10) ? ("0" + value) : String(value);
        }

        const date = new Date(new Date().getTime() - timeAgo);
        return date.getDate() + "." + pad(date.getMonth());
    }
}
This code is equivalent to the original one. There is slightly more code, but it became more readable. Each specific element is rendered with its own method. You can use one way or another. I prefer second way because it is more flexible: you can override any element rendering in an inherited component class. Let's stick to this way in future samples.
Tutorial. Part 2. Child component collections